Provide Access to Spectral RTI Images
The SpectralRTI_Toolkit has options to create three types of output (in addition to intermediate files that facilitate changing some settings without redoing the entire process). Each type of output has its own advantages and disadvantages.
Contents
- What is Spectral RTI and do I need it? (LINK)
- Cost/benefit of adding RTI (LINK)
- Cost/benefit of adding raking (LINK)
- Cost/benefit of adding spectral (LINK)
- How does the integration work? (LINK)
- Capture hardware (LINK)
- Spectral imaging hardware (LINK)
- Fixed dome for RTI capture (LINK)
- Swinging arc for RTI capture (LINK)
- Hand-held flash for RTI capture (LINK)
- Capture procedures (LINK)
- Light position capture and calibration (LINK)
- Hemisphere captures for RTI (LINK)
- Preprocessing typically done at capture (LINK)
- Processing with the SpectralRTI_Toolkit (LINK)
- Software installation (LINK)
- Managing input data (LINK)
- Running for the first time (LINK)
- Select tasks (LINK)
- Adjust brightness (LINK)
- Static raking option (LINK)
- Options for Extended Spectrum (LINK)
- Identify region of interest (for Extended Spectrum and Pseudocolor) (LINK)
- Options for PCA Pseudocolor (LINK)
- Options for custom processes (LINK)
- Light position data (LINK)
- Additional prompts (LINK)
- Tips for frequent use (LINK)
- Make the images accessible to users
- RTI files (LINK)
- WebRTI (LINK)
- Tiled and layered Jpeg2000 files for IIIF (LINK)
- Help make Spectral RTI better (LINK)
- Glossary (LINK)
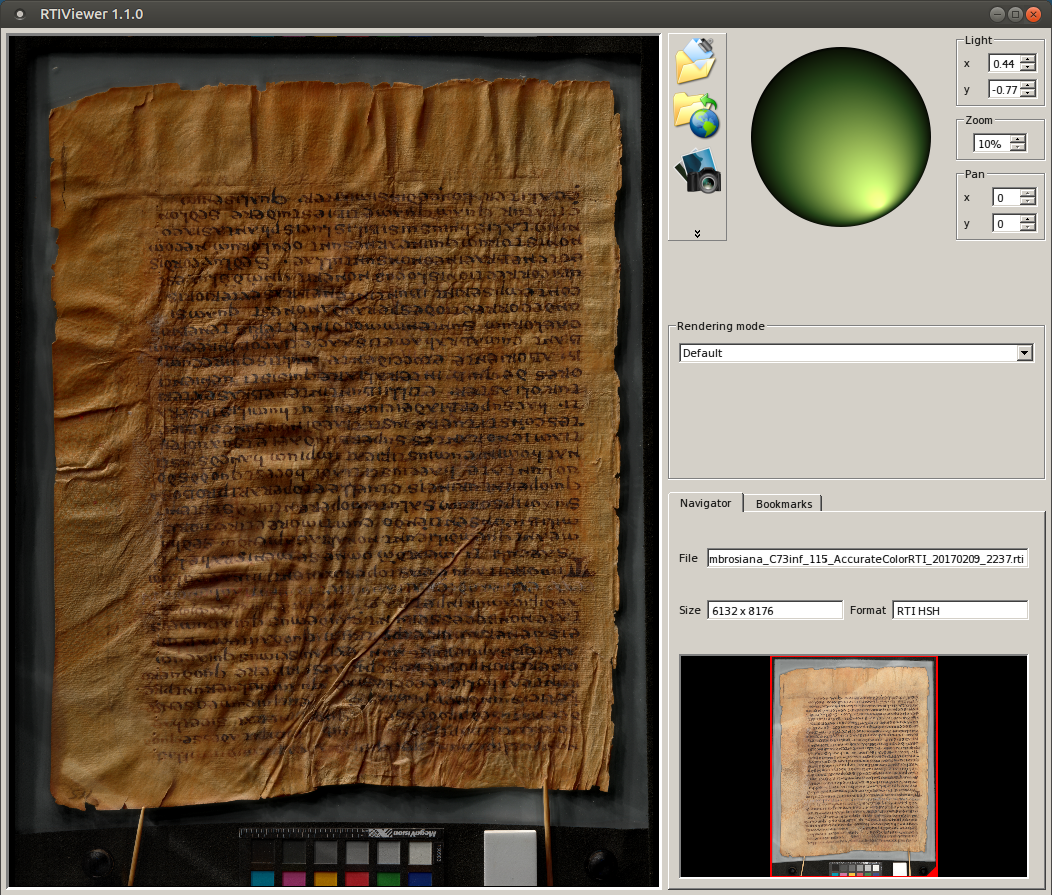
RTI files
The Toolkit creates folders in the project directory that end in “RTI” (e.g., AccurateColorRTI). One RTI file (and 56 or so intermediate jpeg files) can be found in the folder for each color process (Accurate Color, Extended Spectrum, PCA Pseudocolor, Custom). The files can be distributed through external drives or the Internet, but they are large and require a specialized viewer to open, such as RTIViewer (http://culturalheritageimaging.org/What_We_Offer/Downloads/View/) or InscriptiFact Standalone Viewer (http://ruth.usc.edu/ISFStandaloneViewer/).
Advantages
- Once the viewer is installed and the RTI file downloaded and opened in the viewer, the interface is responsive.
- Some of the visualization enhancements available in the dedicated viewers have not yet been implemented in WebRTI.
Disadvantages
- Operating system compatibility. RTIViewer requires MacOS or Windows. InscriptiFact requires Java on Windows, MacOS, or Linux. Neither supports iOS or Android.
- The requirement to download and install software is an impediment to casual viewers.
- The RTI file has to download to the local machine and load into memory in its entirety before any of the image can be seen. The size of an RTI file can easily reach into the gigabyte range.
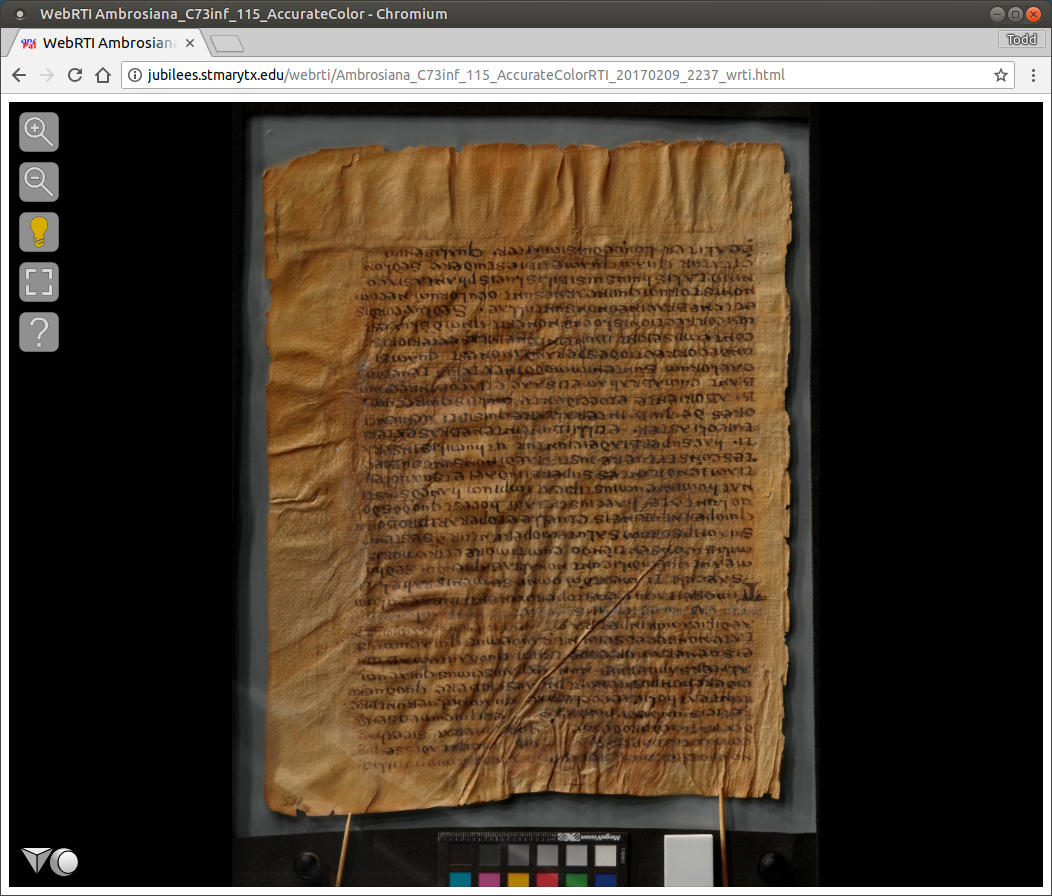
WebRTI
If WebRTI is selected from “Select Tasks” the folders ending in RTI contain an html file and sub-folder containing many small images files. For example: AccurateColorRTI/Ambrosiana_H190inf_036v_AccurateColorRTI_20170710_0816_wrti.html and AccurateColorRTI/Ambrosiana_H190inf_036v_AccurateColorRTI_20170710_0816. These files can be copied to a webserver, along with the JavaScript and stylesheets for WebRTI (http://vcg.isti.cnr.it/rti/webviewer.php), and viewed in any web browser.
Advantages
- User experience. This is the simplest experience of interactive lighting for users. It works in any web browser on any operating system (including Android and iOS). It does not require any plugins or downloads.
- Speed. The image appears almost immediately. The user's web browser downloads only the tiles that it needs, starting with a low-resolution overview and loading detail for a certain area as the user zooms and pans.
- Moderate administrative overhead. It requires a webserver (as opposed to RTI files which can be transmitted on a thumb drive), but only a simple static file web server (as opposed to IIIF which requires configuration for dynamic server processing).
Disadvantages
- Some of the visualization enhancements available in the dedicated viewers have not yet been implemented.
- A 50-megapixel image with default settings creates 9262 static image tiles for each color process. This slows down data management functions that occur on a per-file basis. Efforts to create the option of using IIIF for image tiles are underway.
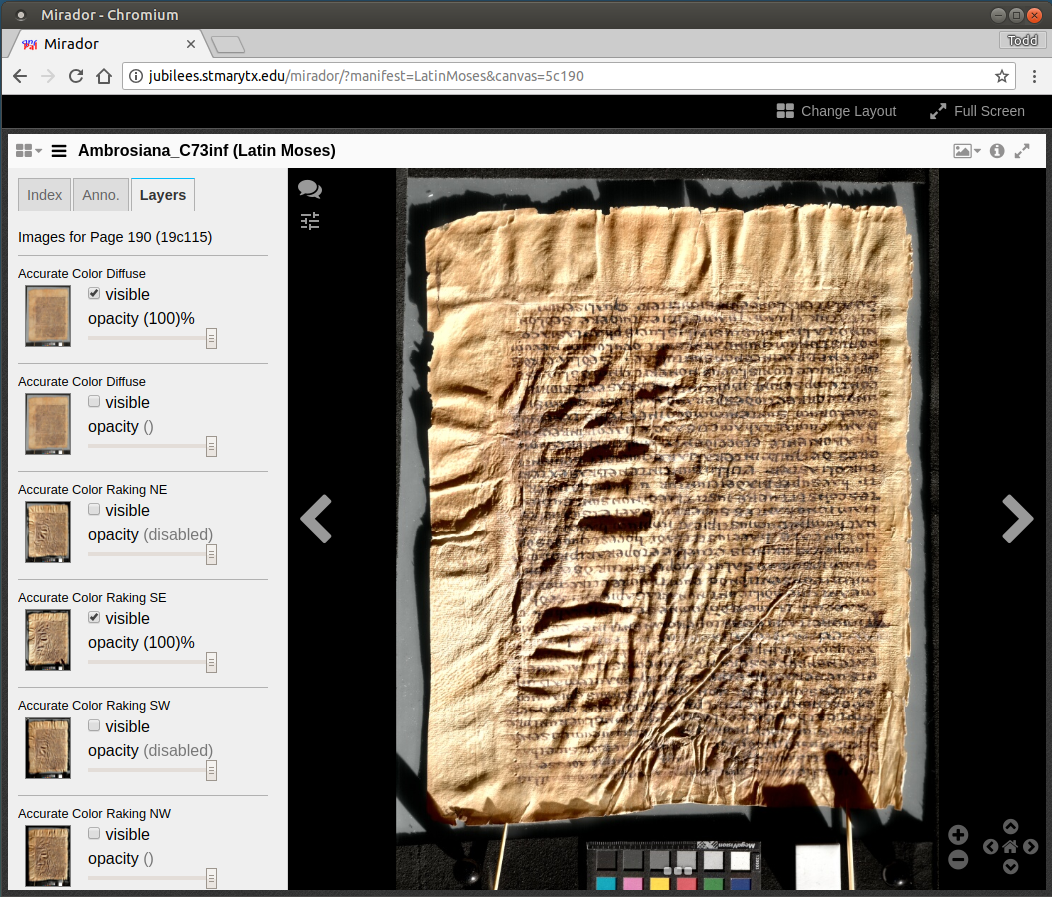
Tiled and layered Jpeg2000 images for IIIF repositories
If Static Raking is selected from “Select Tasks” a folder named “StaticRaking” will be created in the project directory.
The folder contains jpeg2000 (jp2) files for diffuse lighting (numbered 00) and for each light position selected.
The color processes are abbreviated Ac for Accurate Color, Xs for Extended Spectrum, Ps for PCA Pseudocolor, and custom processes are unabbreviated.
Once you have a IIIF Image server, it is a simple matter to copy the jp2 files to the appropriate directory.
Advantages
- The IIIF Image API makes it easy to access images in tiles for pan and zoom viewers such as Mirador.
- The IIIF Image API means that an image is stored once and accessed according to any region and size required. It is no longer necessary to download an image, crop, resize, and upload a new file to use details elsewhere on the web.
- The related IIIF Presentation API opens broad possibilities for situating an image in relationship to other images, pages, and collections and accessing the images through IIIF Presentation viewers such as Mirador.
Disadvantages
- The diffuse and static raking images are not RTI. They are not dynamically relightable nor can the texture be enhanced. At most an annotation in a IIIF Presentation can link to a WebRTI image.
- It is not a trivial matter to configure a IIIF Image repository.
- It is not a trivial matter to create IIIF Presentation manifests. Some of the existing tools to create and edit manifests (other than a text editor) make the one-image-per-page assumption that does not apply to Spectral RTI.