
All the software required for Spectral RTI processing is freely available. Status of operating system compatibility is as follows:
ImageJ is an open-source image processing suite originated by the National Institutes of Health. It is well suited to scientific and medical imaging applications.
Fiji (Fiji Is Just ImageJ) is a distribution of ImageJ that includes additional plugins. Although the extra plugins required for the SpectralRTI_Toolkit can be downloaded separately, we recommend starting with the Fiji distribution.
ImageJ and Fiji require Java, which can be downloaded together with the installer if it is not already installed on your system.
Resources:
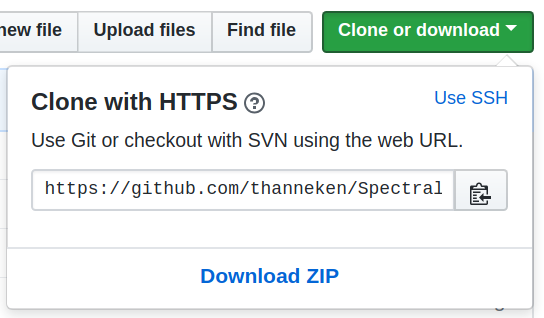
Download or clone the SpectralRTI_Toolkit from its repository on GitHub: https://github.com/thanneken/SpectralRTI_Toolkit
Copy the contents of the folder plugins to the plugins folder in your instance of Fiji.
The RTIBuilder distributed by Cultural Heritage Imaging is the best way to create an LP file (unless you already have one) and also includes the HSHfitter required for creating RTI files.
Windows and MacOS installers are available from http://culturalheritageimaging.org.
For Linux, download and extract either version (e.g., 7z x RTIbuilder_2_0_2.dmg).
The application can be run from a terminal shell by changing to the directory that contains RTIbuilder.jar and entering the command java -jar RTIbuilder.jar.
The included fitter hshfitter.exe can be run in Linux with Wine or compiled from GitHub
The SpectralRTI_Toolkit will prompt when it is time to run RTIBuilder to create an LP file. See below, “Light position data” (LINK).
The Toolkit will give the option of creating “Static Raking” images. “Static” contrasts with dynamically relightable RTI images. “Raking” means any angle of light among the hemisphere captures. Utilizing this option avoids lossy jpeg encoding (currently required for RTI) and creates files ready for IIIF Image repositories (tiled and layered). To utilize this feature it is necessary to download a jpeg2000 encoder. The best available is Kakadu. The executables for Windows, MacOS, and Linux can be downloaded from http://kakadusoftware.com/downloads/.
To prepare RTI files for WebRTI you will need webGLRTIMaker.exe from http://vcg.isti.cnr.it/rti/webviewer.php.
Linux users have the option of running the Windows executable in Wine or compiling from GitHub
Data captured by the Jubilees Palimpsest Project is available for download. Testing on this data can be a good introduction to the software before trying on your own data. A script downloads a set of the necessary data in the required folder structure. The script is available as a bash script (Linux, Mac) and command script (Windows). Note that some directories are optional (transmissive, fluorescence, KTK custom).
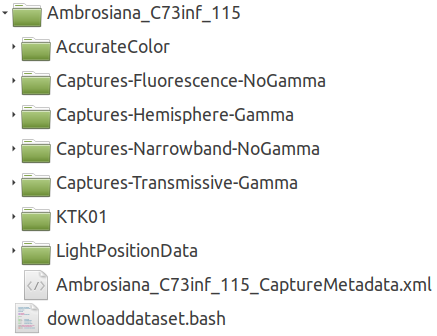
It is strictly necessary that no spaces appear anywhere in the file paths. The Toolkit assumes that all input files are in the tiff format. The Toolkit is indifferent to filenames but requires precise folder names to identify components. Each image set (e.g., page) requires a project folder (e.g. “Ambrosiana_C73inf_115” in the sample data set) and several subfolders, as follows:
AccurateColor (required for accurate color images, strongly recommended)Captures-Fluorescence-NoGamma (can be used for PCA Pseudocolor, optional)Captures-Hemisphere-Gamma (required)Captures-Narrowband-NoGamma (required for Extended Spectrum, can be used for PCA Pseudocolor, recommended)Captures-Transmissive-Gamma (if more than one file is in the folder the user will be prompted to select one, optional)There is not a good way to rotate RTI files after they are created so data should be rotated at this point, if necessary.
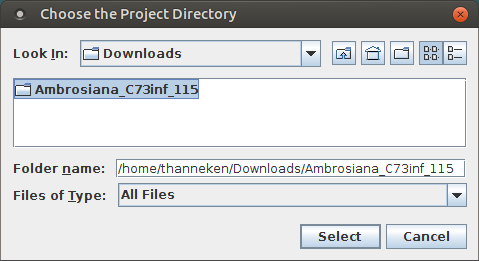
Plugins > SpectralRTI_ToolkitChoose the project directory
Locate the project directory folder that contains the sub-folders Captures-Hemisphere-Gamma, etc.
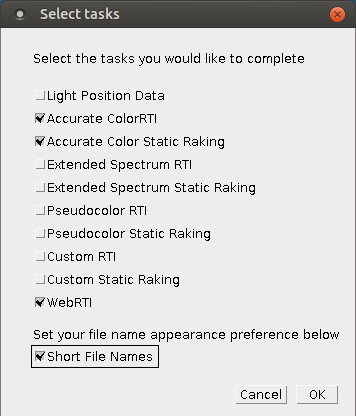
Select Tasks
Select the tasks you would like to complete
LightPositionData subdirectory.AccurateColor subdirectory.AccurateColor subdirectory. This will create tiled and layered Jpeg2000 files for IIIF image repositories without subjecting the data to lossy encoding.Stored Preferences
On the first run a window will notify you that rarely changed preferences will be saved. On subsequent runs previous selections will be listed and can be deleted or edited. The rarely changed preferences are as follows.
kdu_compress recommended, ojp_compress also workshshfitter.exe on Windows, or hshfitter if compiled for Linuxdeferredbatch.cmd, which is very useful for deferring the heavy computation that does not require user interaction.hshfitter compiled on Linux use 1.webGLRtiMaker.exe on Windows/Wine or webGLRtiMaker on Linux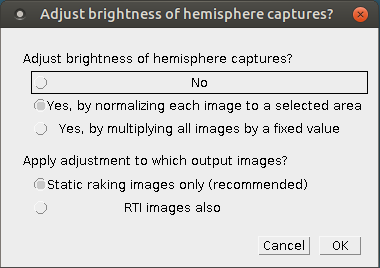
Adjust brightness of hemisphere captures?
Adjust brightness of hemisphere captures?
The hemisphere captures use the same exposure settings for all light positions, which is valuable for rendering RTI images, but leaves the static raking images too dark. Most users will want to normalize each image to a selected area for Static Raking images only.
Apply adjustment to which output images?
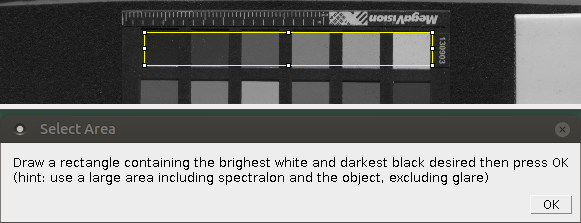
Select area
Draw a rectangle containing the brightest white and darkest black desired then press OK
(hint: use a large area including spectralon and the object, excluding glare)
This option appears if “normalizing each image to a selected area” was chosen on the previous dialog.
Select Transmissive Source
This option appears only if a Captures-Transmissive-Gamma directory is found in the project directory and contains more than one image.
If there is only one image it will be used without prompting.
If there are several transmissive options one must be selected.
If the best option is not known, preview the options in another program.
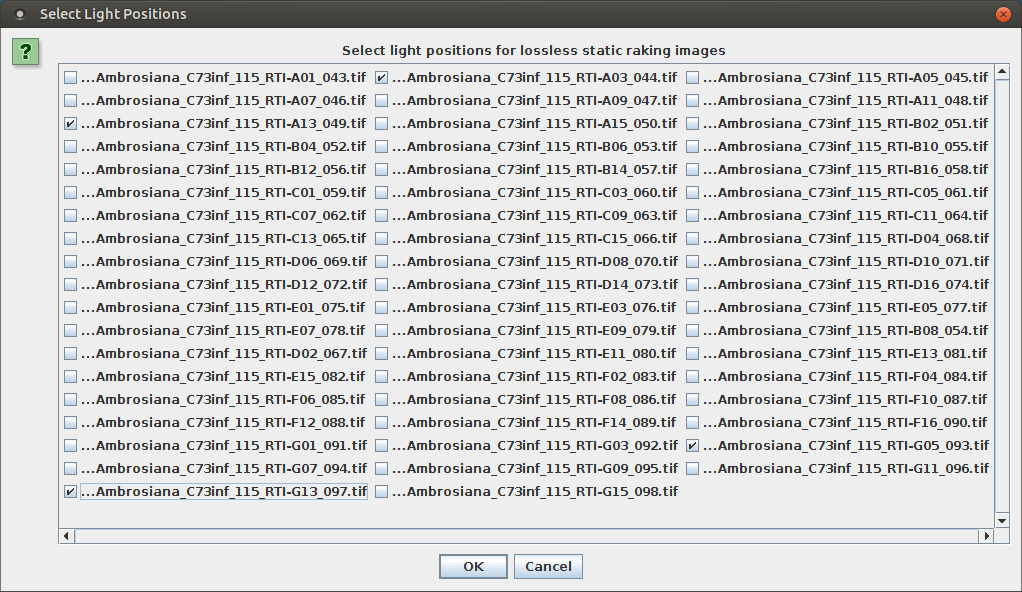
Select light positions
Select light positions for lossless static raking images
This option appears if “Static Raking” was selected under “Select Tasks” previously.
The prompt will list the images found in the Captures-Hemisphere-Gamma directory.
Typically one might want low angles from four directions, minimally impacted by shadow from the copy stand.
When using the MegaVision Arc for RTI the positions A03, A13, G05, and G13 are good choices.
Otherwise, preview the options in another program to identify the best raking angles.
Prompts for “Locate Fitter” and “Locate kdu_compress” might appear at this point. See instructions below.
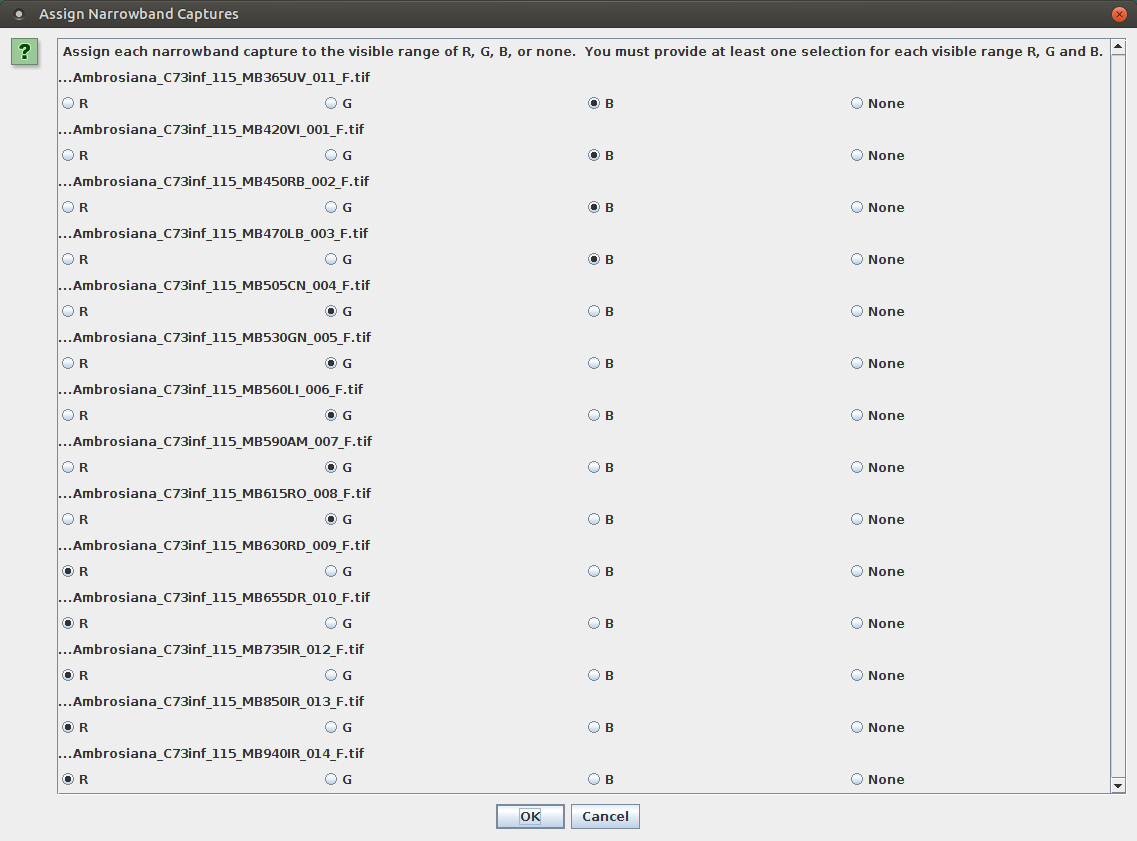
Assign Narrowband Captures
Assign each narrowband capture to the visible range of R, G, B, or none
This option appears if “Extended Spectrum” was selected under “Select Tasks” previously.
The prompt will list the images found in the Captures-Narrowband-NoGamma directory. The default options should work well if the filenames sort from shortest to longest wavelength. Roughly a third of the images with the shortest wavelengths should be assigned to the B (blue) category, the middle wavelengths to the G (green) category, and the longest to R (red) category. Use “none” if that image should not be used for Extended Spectrum processing.
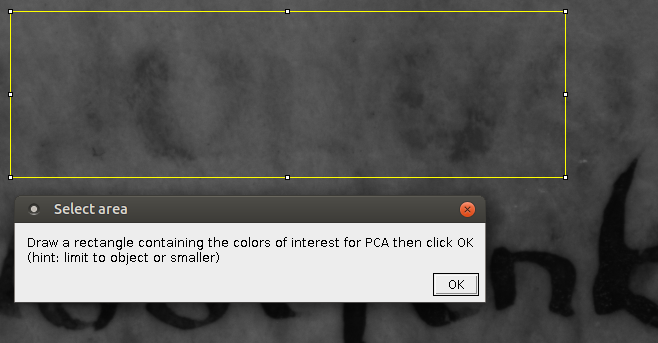
Select area
Draw a rectangle containing the colors of interest for PCA (hint: limit to object or smaller)
Situations and opinions differ with respect to how small the rectangle should be (e.g., should it include overtext), but it is at least clear that it should exclude non-artifact distractions such as the color checker chart.
Select sources for Pseudocolor
Pseudocolor images require two sources images (typically principal component images).
Method:
PCA in the project directory.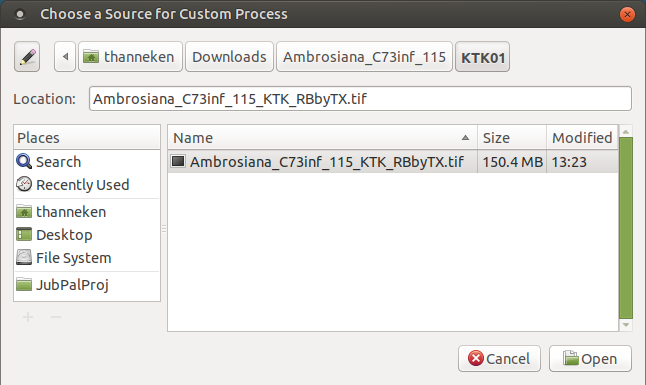
Choose a source for Custom Process
SpectralRTI_Toolkit can also take chrominance information from any stack of one, two, or three layers.
The image should be in a subdirectory under the project folder with any name
(e.g., CustomColor1, or in the example set, KTK01).
Light position data is necessary for RTI (not raking). If a dome or arc is used the light position data can be calibrated once and reused (even with rotation). With a handheld flash it must be processed for each set.
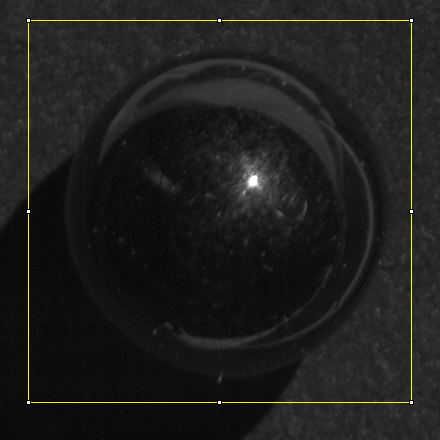
Select ROI
Draw a rectangle loosely around a reflective hemisphere and press Ok
This is the beginning of the process to create a Light Position (lp) file. Make sure the rectangle includes the entire reflective sphere.
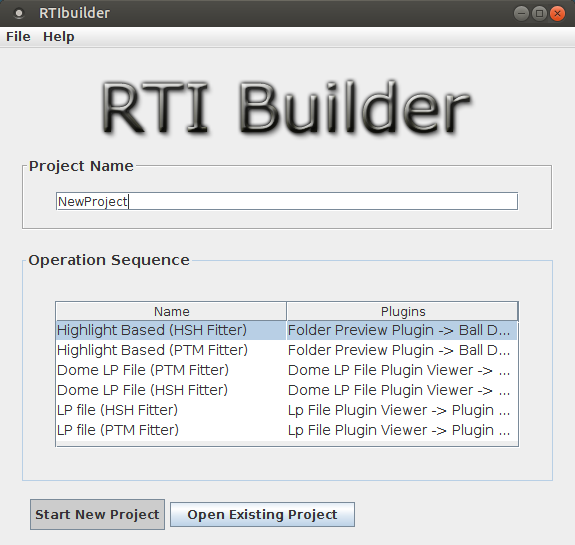
Use RTI Builder to Create LP File
Please use RTI Builder to create an LP file based on the reflective hemisphere detail images in [Project Directory\LightPositionData\
Press cancel to discontinue Spectral RTI Toolkit or Ok to continue with other tasks after the lp file has been created.
Leave this window alone and start RTIBuilder (see above, Software installation)
RTI Builder has its own Documentation. A brief summary is offered here.
Give the project any name (e.g., shinysphere) and select Highlight Based (HSH Fitter) for the operation sequence. Click Start New Project
Click Open Folder and navigate to your Project directory and select the folder LightPositionData. Be sure to select that directory and not the parent directory or the jpeg-exports folder within it.
If the capture went well each image should have a highlight (glare spot) on it, but you have the option of deleting failed shots here. Then press Next.
Again, draw a rectangle around the sphere. Click Add Area then Detect Spheres
The software tries to identify the center and radius of the sphere. Check by clicking on different images, especially “Median.” If it is necessary to change the radius or center be sure to click Set New Center before Next.
Click Highlight detection and a red cross will appear where the software detected the highlight. Click Next
If the field “HSH Fitter Location” is not already filled, click Find and navigate to the file HSHfitter. Take note of the location, as you will need it later.
Click Execute. The software may return “Fitting Completed” or an error message, but it does not matter as long as the LP file was created. Close RTIbuilder and return to ImageJ.
At the prompt “Use RTI Builder to Create LP File” click OK. The processing will run for several minutes, depending on options selected.
Locate Preferred RTI Fitter or cmd file for batch processing
The straightforward option is to direct the prompt to the path RTIbuilder_v2_0_2\Fitters\HSHfitter\hshfitter.exe (or without the .exe extension on Mac or Linux).
See “Use deferredbatch.cmd” under “Tips for frequent use” below for the advantages of deferring HSH fitting.
The deferredbatch.cmd is also convenient for running on Mac and Linux.
This option does not change frequently so is remembered and set to default the next time the Toolkit runs.
If not already downloaded at the installation stage (above), download webGLRTIMaker.exe from http://vcg.isti.cnr.it/rti/webviewer.php.
Locate kdu_compress or ojp_compress
If not already downloaded at the installation stage (above), download from http://kakadusoftware.com/downloads/, install, and point the Toolkit to the kdu_compress executable. The location will be remembered on subsequent runs of the Toolkit.
If PCA Pseudocolor was selected with the option to generate and manually select two slices (principal components),
the following prompt will appear after PCA was run on the files in Captures-Narrowband-NoGamma and Captues-Fluorescence-NoGamma.
This is also the most RAM intensive part of the process.
If there are too many files in those folders consider deleting some files or moving them to a new folder such as Captures-Fluorescence-NoGamma-skip.

Select area Delete slices from the stack until two remain
Enhance contrast as desired
Then press Ok
If the images are too dark are light (which is likely) it will be helpful to enhance contrast.
Draw a rectangle around a region of interest (a region that should not be washed out in black or white).
Then use Process > Enhance Contrast and check Process all slices.
The number of slices in the stack is equal to the number of narrowband captures. The last few are typically all black. Delete those, then delete the least helpful slices until two remain.
Let HSHfitter and WebGLRtiMaker run in batches overnight.
You can save waiting by deferring the time-consuming HSH fitting process.
This could also be helpful if you need or want to use multiple computers or operating systems.
First, create a file named deferredbatch.cmd (or deferredbatch.bash).
Run the Toolkit and clear the selection for preferred fitter.
When prompted to identify the fitter, point to the cmd file. Now the toolkit will add commands to the batch file rather than running the fitter.
When you want to start the batch, execute the cmd file.
If the HSH Fitter and WebGLRTIMaker (if desired) are not in your path you could add them in the operating system or as an initial command in the cmd file.
For example, a deferredbatch.cmd generated in Linux with intent of running in wine could look like this:
path=%path%;Z:\home\thanneken\wine\HSHfitter;Z:\home\thanneken\wine\webRTI
hshfitter /home/thanneken/Downloads/Ambrosiana_C73inf_115/AccurateColorRTI/Ambrosiana_C73inf_115_AccurateColorRTI.lp 3 16 /home/thanneken/Downloads/Ambrosiana_C73inf_115/AccurateColorRTI/Ambrosiana_C73inf_115_AccurateColorRTI_20180603_0131.rti
webGLRTIMaker /home/thanneken/Downloads/Ambrosiana_C73inf_115/AccurateColorRTI/Ambrosiana_C73inf_115_AccurateColorRTI_20180603_0131.rti -q 100 -r 8192
hshfitter /home/thanneken/Downloads/Ambrosiana_C73inf_115/ExtendedSpectrumRTI/Ambrosiana_C73inf_115_ExtendedSpectrumRTI.lp 3 16 /home/thanneken/Downloads/Ambrosiana_C73inf_115/ExtendedSpectrumRTI/Ambrosiana_C73inf_115_ExtendedSpectrumRTI_20180603_0228.rti
webGLRTIMaker /home/thanneken/Downloads/Ambrosiana_C73inf_115/ExtendedSpectrumRTI/Ambrosiana_C73inf_115_ExtendedSpectrumRTI_20180603_0228.rti -q 100 -r 8192
hshfitter /media/thanneken/Jub-02/Projects/Ambrosiana_C73inf_115/KTK01RTI/Ambrosiana_C73inf_115_KTK01RTI.lp 3 16 /media/thanneken/Jub-02/Projects/Ambrosiana_C73inf_115/KTK01RTI/Ambrosiana_C73inf_115_KTK01RTI_20180601_0359.rti
webGLRTIMaker /media/thanneken/Jub-02/Projects/Ambrosiana_C73inf_115/KTK01RTI/Ambrosiana_C73inf_115_KTK01RTI_20180601_0359.rti -q 100 -r 8192
The batch could run in Wine on Linux by
changing to the directory with the deferredbatch.cmd file,
starting a Windows command prompt,
and executing the command file.
For example,
$ cd wine/HSHfitter/
$ wine cmd
Microsoft Windows 5.2.3790 (2.4)
Z:\home\thanneken\wine\HSHfitter>deferredbatch.cmd
When using a handheld flash a new LP file must be generated for each object (but not each color process). The beauty of a fixed dome or stable arc is that the LP file can be created once from a calibration sequence and reused.
Edit the LP file created from the calibration sequence and replace the file path up to the position identifier with the word “canonical.” For example, the first few lines of a reusable LP file might read:
56

canonical-A01_043.jpg 0.17889495 -0.9825294 0.05130836

canonical-A03_044.jpg 0.46035585 -0.8594868 0.22215976

canonical-A05_045.jpg 0.7653712 -0.56276625 0.31225163

canonical-A07_046.jpg 0.90808934 -0.28366238 0.3080737

canonical-A09_047.jpg 0.9675771 0.09901111 0.23236032
If some images are rotated (but the capture apparatus remains fixed) LP files appropriate for other rotations can be derived by switching columns and inverting values, as appropriate.
| x90° = y0° | y90° = -x0° |
| x180° = -x0° | y180° = -y0° |
| x270° = -y0° | y270° = x0° |
The regular expressions to create a canonical lp file with rotation are as follow.
| Rotation | Regular Expression |
|---|---|
| 0° | s/^.+(-[A-G][0-1][0-9]_[0-9]+\.jpg) (.+) (.+) (.+)$/canonical\1 \2 \3 \4/ |
| 90° | s/^.+(-[A-G][0-1][0-9]_[0-9]+\.jpg) (.+) (.+) (.+)$/canonical\1 \3 -\2 \4/ |
| 180° | s/^.+(-[A-G][0-1][0-9]_[0-9]+\.jpg) (.+) (.+) (.+)$/canonical\1 -\2 -\3 \4/ |
| 270° | s/^.+(-[A-G][0-1][0-9]_[0-9]+\.jpg) (.+) (.+) (.+)$/canonical\1 -\3 \2 \4/ |
| all | s/--//g |
For any project directory with the same light positions, simply create a sub-directory LightPositionData and copy the canonical lp file into the directory.